
Pretty much everyone has ridden a bicycle. Even if you have not been on one for a while, the first time you climb onto the saddle it all comes back to you. It’s just like, well, riding a bicycle. Engage those pedals and start rolling!
A lot has changed over the years, and a lot of science and engineering has been spent in the pursuit of making that action more efficient in order to get you down the road faster. And in case you haven’t noticed people, we got us a whole lotta road to cover. So let’s talk about pedals, shall we?
The basic, flat pedal is a perfectly good way to move a bike forward, and lots of folks still use them for distance riding, but connecting directly to the bike with a cleat enables a rider to use both sides of the pedal stroke to deliver more power with less work, and on a long ride like ALC, this can really help. The trick to these is learning how to spin in a smooth circle, as opposed to simply applying pressure to the pedal on the down stroke. Simply dropping your heel slightly on the down stroke forces you to pull up a bit with your hamstrings on the upstroke. Think of it as spinning your knee in a smooth, consistent circle. And yeah , everyone goes over at least once, but they are easy to adapt to. Many people fear that they will be stapled to the bike, but basically you are using a miniature ski-binding that is designed to maintain contact with the pedal while allowing you to disengage quickly when needed.
Now for the fun part. There are a lot of different systems out there for you to choose from, so here is a quick breakdown on some of the most popular styles for you. It all comes down to efficiency. For most riding, a good grippy pair of flat pedals will do the trick. The real advantages of clipless pedals are found in racing and climbing. But it’s not just the pedal. Ya gotta use ‘em right. In this post I am going to focus on some of the most common styles of pedals.
One term that you will hear a lot when talking pedals is float. Float is the amount of side to side rotation expressed in degrees that a pedal will allow your foot to move before the cleat disengages. That float is important in reducing stress on the knees and increasing your comfort while riding. Will talk about those in the description of each type..
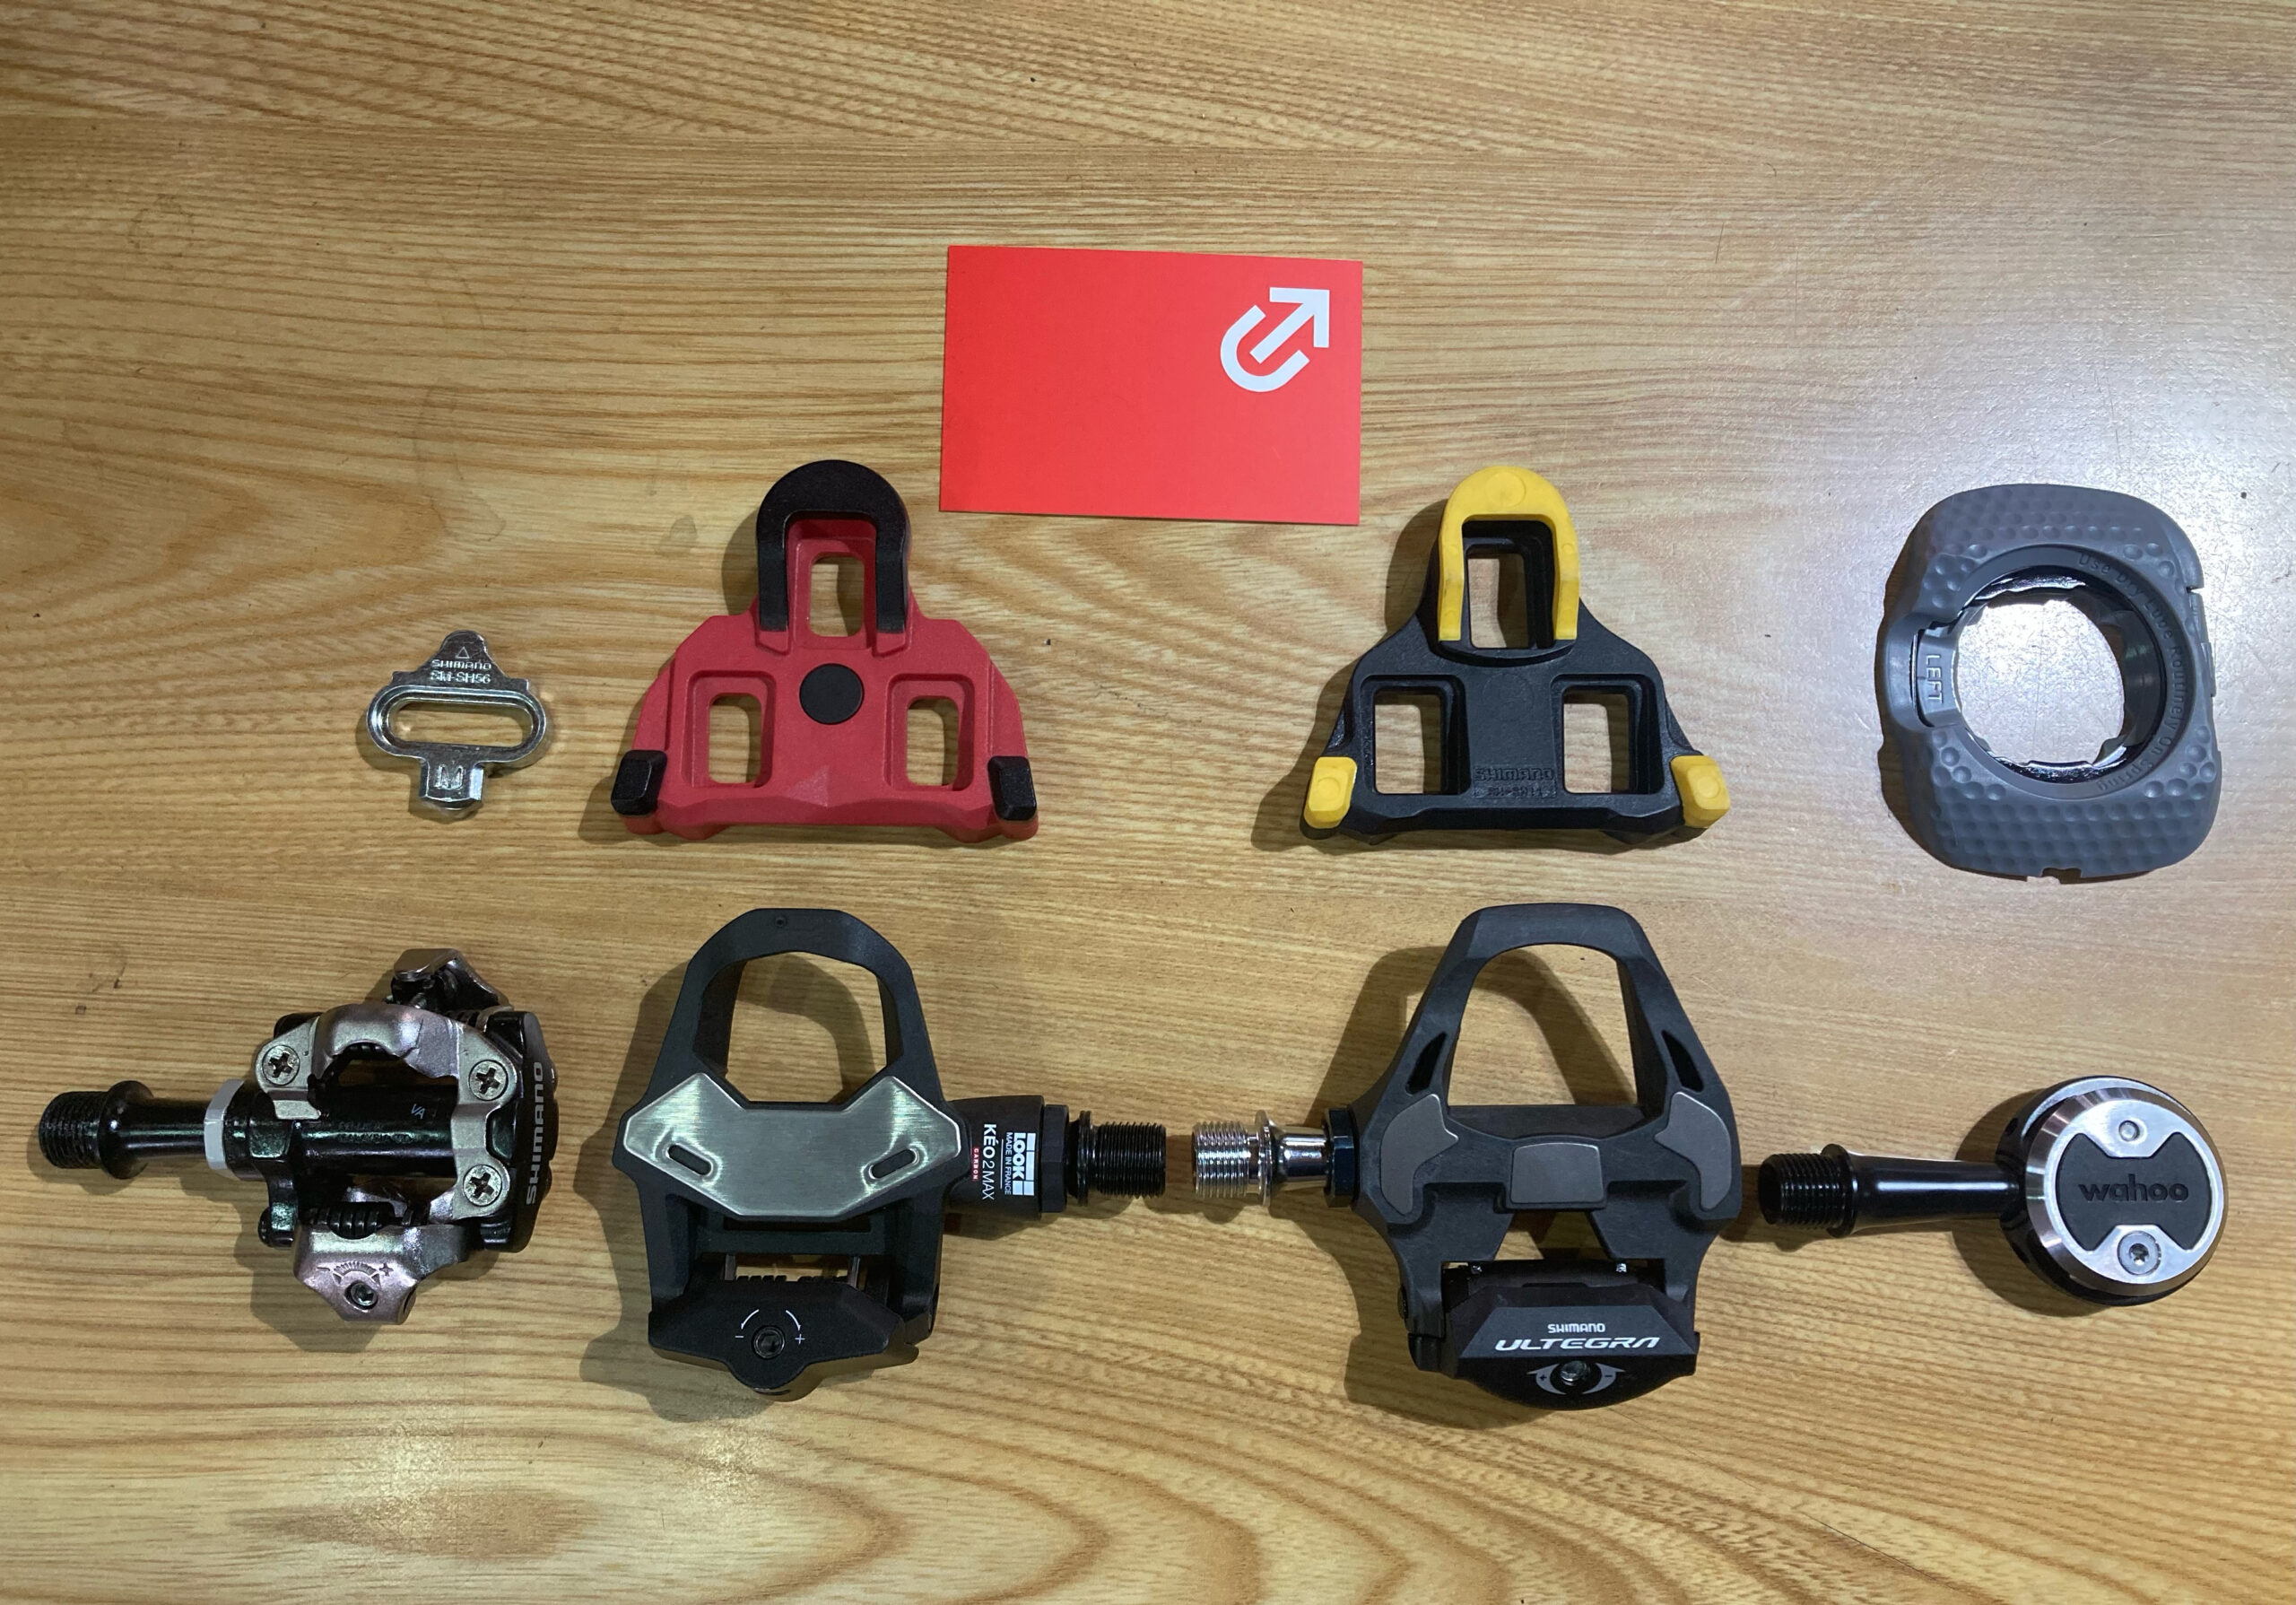
Traditional road pedals: These are the classics. Two of the basic styles are the Shimano SPD SL or the Look Keo, using a triangular cleat to connect with the pedal. Another option are Speedplay pedals, which use a circular cleat recessed into a square frame attached to the sole of the shoe. Shimano and Look use cleats unique to their brand, though similar to each other. You enter the pedal through one side only. The Speedplay, on the other hand, can be entered through either side of the pedal. If you are watching races, these three are the types of pedals that most riders are using.
Pros: The wide platform and ultra stiff soles of a road specific shoe deliver high efficiency power transference. All offer various degrees of float, with Speedplay allowing the greatest range at up to a total of 15 degrees. Shimano pedals offer:
SM-SH10 (Red) allows 0 degrees of float.. (Don’t. Just don’t unless you are racing at the Velodrome and have a great orthopedist.)
SM-SH12 (Blue) allows 2 degrees of float.
SM-SH11 (Yellow) allows 6 degrees of float.
Look Keo Pedals offer:
Cleat Keo (Black) allows 0 degrees of float. (See above on the matter of 0 float…)
Cleat Keo (Gray) allows 4.5 degrees of float.
(Cleat Keo (Red) allows 9 degrees of float.
Look Keos also offer a Cleat Grip model which is designed for for use with carbon fiber soled shoes, to prevent slipping on that surface as well as the walking/pedal side. There is also a Delta model that is used for indoor trainers,
Cons: Road specific shoes are the type of cycling shoes that make you look like a stoned penguin when walking. The plastic cleat also wears down quickly unless you are carrying cafe covers with you for the times you are not on the bike. If using these on ALC, I highly recommend bringing at least one extra set of cleats and cafe covers,
Mountain bike style pedals: A different style of cleat such as the Shimano SPD and Look X-Trac. These pedals use the same, identical metallic cleat. Most of these pedals can be entered from either side, though both brands offer a hybrid that is cleated on one side and flat on the other. The big difference is in the shoes. Instead of walking directly on a somewhat awkward wedge under the ball of your foot, the cleat is recessed within the sole of the shoe. Like a road model, the shoes are also quite rigid, but a bit more flexible, which means you can actually walk in a reasonably normal manner. The cleats themselves are also metal as opposed to plastic, and that is huge.
Pros: SPD shoes are comfortable for walking and the cleats are far more durable than a road cleat. Mountain shoes are still stiff enough to provide the benefits of clipless riding. Shimano SPD pedals offer 4 degrees of float, with two models of cleats:
SM-SH51 (Black) Allows engagement by side to side rotation only.
SM-SH56 (Silver) Allows for clipping-out with die to side rotation or or by lifting the heel
The Look Keo pedals offer 6” of float, and similarly have two cleat options:
Cleat X-Track (Black) Allows engagement by side to side rotation.
Cleat X-Track Easy (Silver) Allows for clipping-out with side to side rotation or or by Lifting the heel.
Cons: Not many, but if you are constantly checking your power meter for maximum wattage and a higher FTP, stick with road. Mountain style shoes are generally not quite as efficient as a road shoe for that purpose.
For ALC, I am a fan of mountain style clipless pedals, for one really big, fat important reason and it has not a damn thing to do with the bike or pedal efficiency. It’s all about walking. You may not realize it but you have actually signed up for a Bike ‘n Hike event. We walk a lot out there. Our tents don’t have curbside parking, I fear. You will be walking from your tent and gear truck to your bike each morning, and vice versa in the afternoon. And for the record these campsites are kinda spread out. You will also be stopping at 4 or 5 rest stops every day, and since the ride is not set up for drive thru service, once again you will be parking and hiking, frequently across vast expanses of gravel or asphalt.
Now. Once you have got the pedals on the bike be prepared to enter the learning curve zone. If your bike shop has the ability, ask if they can set you up on a trainer for a few minutes to get used to the feel and placement. The first time you clip in on a trainer, look down and carefully observe where everything is as you aim your foot towards the pedal. Now. Do not ever do that again. Eyes on the road. Always. Get used to just getting your foot to the pedal and working the cleat into place. It takes some practice, but here’s the thing; you can pedal whether you are clipped in or not. The first two words of the Hitchhiker’s Guide To The Galaxy apply here; Don’t Panic. Just pedal until your cleat finds its way home. After a while this will become rote. Why not look down? Think about it. When you are starting out from a stop sign at an intersection, you want your eyes on the road ahead, not your danged shoes.
Another great way to practice is go out to a quiet place like a grassy park or a big parking lot and have a riding buddy with you to call out stops at random. When clipping in, try not to use too much pressure. Should you miss, you want to be able to pull back and recover quickly,
The goal here is to maintain a smooth and even pedal stroke where you always feel engaged with the pedal, without any lags and clunks as you reach the top of the stroke. Think of it more as spinning your knee in a smooth circle as opposed to pushing down on the pedal. Dropping your heel ever so slightly as you cross the top of the stroke will help in accomplishing this, as it will force you to engage your hamstrings as you come up on the other side.
Clipping out is a simple kick outward of the ankle. Avoid trying to power out, as this can cause the dreaded fulcrum effect. You know, for every action there is an equal and opposite and all that. That can throw your weight to the opposite side, leaving you with one foot in the air and the rest of you heading for the pavement. A good trick someone told me once was to drop your shoulder slightly on the side you are clipping out on until you get used to things. Some new to clipless riders will also clip out on both sides just to be sure…
So. Now that you are all set up with your bike and hopefully training every weekend, in the next post we will start getting into the fun part. Preparing for and living on the ride…


